The Einsteinian ZoneJan 31, 2025 So Einstein was this 20th-century scientist/physicist who created some of the most "beautiful" theories and hypotheses since Newton discovered the Laws of Gravity. Some of them are
mind-bending and hard to grasp - the closer you travel to the speed of light, the less you age - and more about time and space. If time and space can be bent, then travel through space can be shortened - yeah, that's mind-bending! If I think about that too much, I'm confused and have to go off and sew straight stitches for a while to get my reasoning back!
But what about having Einsteinian Zones in sewing? That's where you have specific areas where you release the seam, which makes the area tighter, and when you take up the seam, it makes the area bigger. Yeah, I said that right. It's backward to everything we know about sewing. And it almost defies everything we know about sewing.
So you have this down and accept that these areas are backward from all the other seams, but here's the big catch:
These Einsteinian seams cross over into regular seams.
No this isn't like the crossover stream in Ghostbusters. It's actually easier than that. A Closer Look
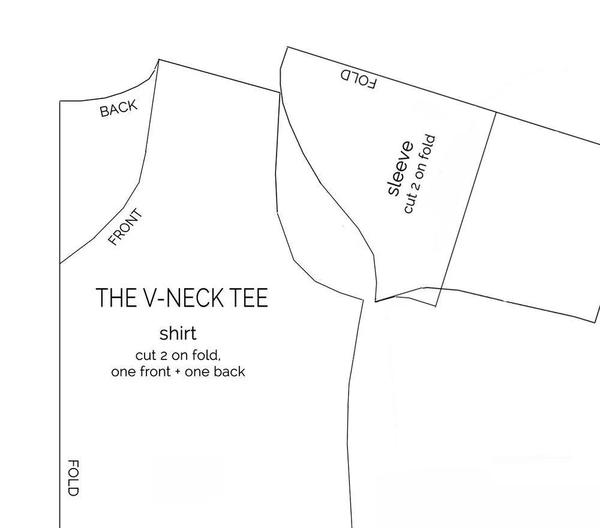
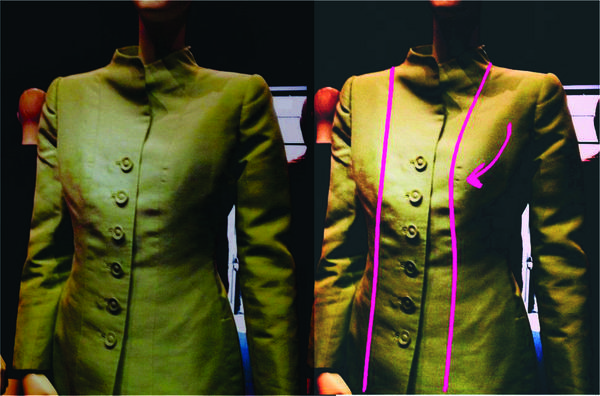
So immediately we can see lots of problems here. That sleeve from the underarm to the shoulder (the fold), ain't working. There's a big gap, and further the sleeve at the top looks way too long.
Because of the curves, that throws all the measurements off. And then on top of that you have the top part which looks like it has about 2 miles of fabric, that you have to ease into the top sleeve seam on the bodice, and it's about 2 inches long, and well,
it just isn't going to work and that's that.
Granted this is confusing, and to make matters worse, this seam includes an Einsteinian Zone on the bottom half of the armhole seam. The reason this matters is that if you plan to alter this seam, you have to know where that curve (or crossover) point occurs. Why? Because at the top releasing the seam makes it bigger, but if you don't crossover, at a "certain point" then you have one part with more space and you're
taking up in another space.
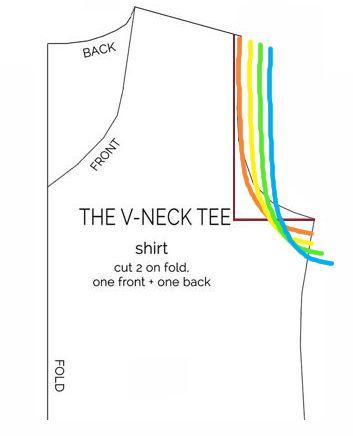
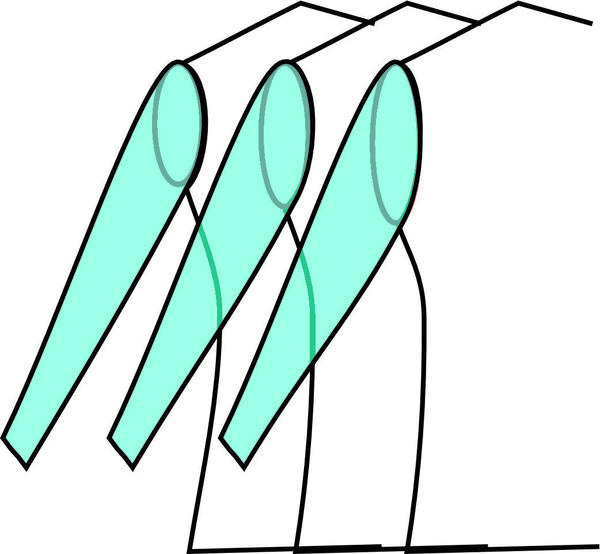
If we were to plot this out to enlarge the whole space, it would look like this in increments. These lines have to cross over to allow for the enlargement on the top and the bottom. In the example below, the entire seam is being enlarged - shoulder and underarm.
You can clearly see here that there is a crossover zone within the curve showing that while the seams, from orange to cyan, are wider from the shoulder, the seam is being taken in at the underarm. Now, you don't always need to widen the shoulders (particularly if you start the pattern with your shoulder width, which is what you should always do because you can see just how hard it is to
negotiate this alteration), while you are lengthen (or taking in) the underarm. Most of the time, you will be doing one or the other - widening the shoulders or enlarging the armhole at the underarm.
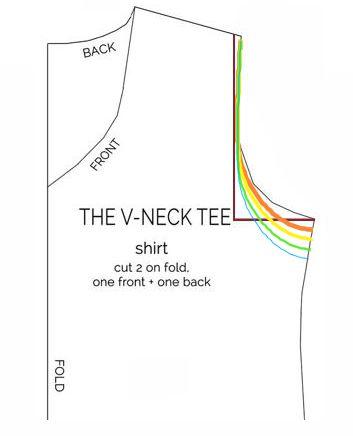
This is the more probable altheration you would make where you aren't so much taking in as you are lengthening the armhole seam.
Another interesting feature is that when you lengthen the armhole, you are making it bigger (remember you are
taking in here, so you are enlarging it), which means the sleeve will need to be larger.
To make this seam even more magical, when you enlarge the armscye on the bodice, then make the armhole larger to fit that bodice armscye which becomes an alteration for large biceps. Even though it may look like that armhole needs to be higher (at the top of the underarm), most of my students and clients with large biceps like having extra space under the arm, which also
accommodates that large bicep. This is my go-to alteration for a large bicep. I think it's kinda magical how that works. But then I don't have a life and think this magical manipulation of a pattern is fun!
The way I like to do this is to make the sleeve to fit the client's/student's bicep and then work from the shoulder notch at the top of the sleeve head, building in that ease and header around the sleeve head. I bring it down to the middle of the armhole (remember, the
bottom half doesn't need to be eased) and allow the sleeve to lie flat to show you how much longer it takes to make the bodice armscye.
As you move from left to right in this sketch, you can see how much larger the bicep is in the sleeve, but the position of the shoulder does not change, nor does the width of the bodice armscye. Remember, you've measured your shoulder, so it's a good
measurement. It's the sleeve, particularly the bicep, that we are altering, and we do it by sneaking in that lengthened sleeve into the bodice armscye Einsteinian Zone. We don't have to widen that armscye because that would be a whole other measurement (chest, bust, etc.), but we need to add to the circumference of the armscye in the bodice to accommodate the enlarged sleeve head to fit the bicep.
What makes these seams so difficult is that they react and give opposite results on the horizontal line (width) than the vertical line (length). You need the front bust dart alteration for the chest or bust width extension. Sometimes, the back needs
altering, but that can be done differently.
You do have that problem when doing a chest/bust alteration. If you make it more prominent through the bust by slashing the pattern vertically and adding the required measurement, the shoulder needs to be increased, but the back shoulder doesn't need to be increased. The best solution is the front bust dart, which adds where you need it and takes it away from where you need it.
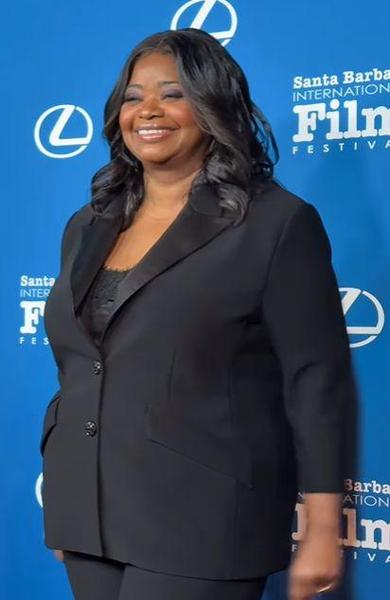
Here's an excellent example of a shoulder on a large bicep person. It can be done well, as in Olivia Spencer at the Golden Globes. The shoulders are well-placed, and the drape and hang are elegant. This PROVES that it is possible to have a
beautiful garment that can fit any shape.
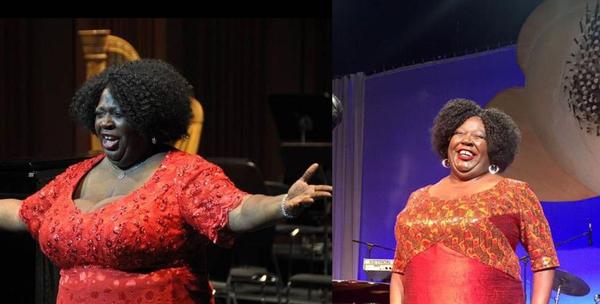
There are some other examples that are key to this fit, and one of them is well-fitting under garments. You can not have an excellent fit like this without a good bra.
This is an opera star about six months apart. She has an excellent fit on the right and a haphazard on the left (if not ready for a wardrobe disaster). This makes the point about good undergarments. Of course, the expression on her face doesn't
hurt either.
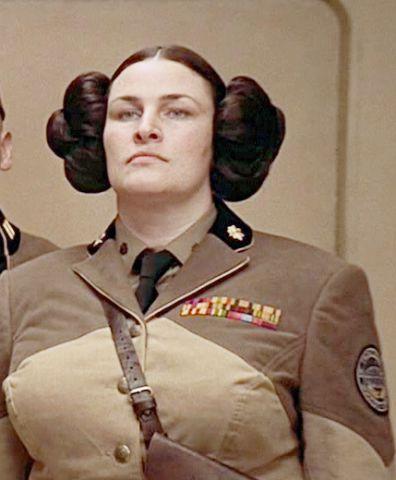
Although this is a costume for a sci-fi movie, the fitting of this jacket is exemplary. I didn't know who did the costumes; I thought it was just a sci-fi movie, so it wasn't much. It turns out the designer is one of the preeminent designers of Paris,
Jean-Paul Gaultier. Well, no wonder the fit is excellent. First, he used beautifully fitted undergarments and then used all the great tools at his disposal, including the famous princess seam.
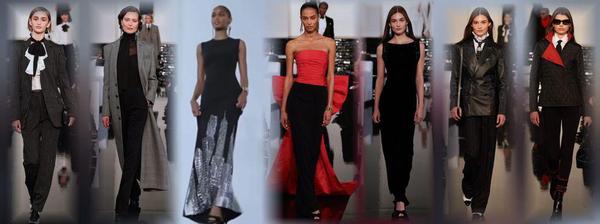
So this is the typical example of fitting a shape that so many haute couture designers have. They show their new designs on models no bigger than sticks, but the truth is that it's the "grande dame" silhouette that he has to fit. Here, Oscar de la
Renta used princess seams to fit and shape a garment for this shape that is not a stick. At the same time, this garment has a pleasant silhouette and lovely fit, furthering Oscar de la Renta's excellent reputation for fitting significant profiles in the world that are not stick figures!
One last caution. Like all alterations and adjustments on patterns, when you try to make two or more sizes up or down, you start to get into significant re-designs of the pattern. That requires a different kind of alteration, but don't worry,
there is a way to alter this type of body shape because - guess what? There are more of these kinds of shapes out there than not. So you are not weird, you are simply not fitted by the RTW, but as a sewists you can fit yourself and look as good (if not better) than Ms. Spencer at the Golden Globes.
There's another part of the body that uses the Einsteinian Zone, but I don't want to bore you with too much sewing "sci-fi" in one post. I'll cover more of that next week.
In the meantime, don't hesitate to play with this alteration on the armscye
to get the fit and comfort you need and want.
The SewingArtistry Resource Library is designed to contain information to not only make your sewing better, but to aid in you fitting and flattering your shape, size and style. Check it out.
Look for future classes coming in 2024
The Core Pattern Shirt, (one of my favorites for woven core pattern that you can make into a myriad of different
garments),
Basic Knit Top (core pattern class for knit basic tops, shells, tees, dresses, and tunics)
|
Tracking a fashion trend isn't all that hard after seeing a few of them.
Living from Mid-Century Modern through Twiggy...
It's worth the time to look at these styles, particularly today as
there is a group of that wants to look....
This is the way fashion used to be -- pretty, flattering and I can't wait to make some of...
NOTE: There are some folks who can't get my email, or it's sporadic, or something is hinky. I will always respond to any of you who send a private message, whether it's about the topic of the week or something else. If you don't get anything
from me, it's probably because the [email protected] email is blocked, and even a private message can't get through. In that case, I'm on Instagram often, and you can always PM me at @sewingartistry.
As a precaution,
please ensure I'm in your email Address Book and check your spam, junk, and trash folders. Some email clients get extra excited when they see emails coming into the Inbox that go to many other receivers. They automatically think it's trash or spam, and it never makes it to the Inbox. I must constantly check my spam and junk folders to ensure I'm getting the emails I subscribe to.
To view in browser along with past emails, click here. We respect your email privacy. |
|
|